Jan 2021 Newsletter - Transmissions Vol 25, 2021
 Vol. 25, 2021
Foreward
“Life goes on.
It happens ev'ry day.
So appreciate what you got.
Before it's taken away.”
The year was 1977, about the time I started my gear career. Lyrics from the Kinks, “Life Goes On” song from the Sleepwalker album. That’s right, LP, Long Play album, 12” diameter, 33-1/3 rpm long before CD’s or music download and streaming became the norm. These words are even more appropriate during these challenging times, but life will go on.
After over 40 years in the gear industry, over 20 years directly involved with the Gear Research Institute (GRI) and President of the GRI since 2017, I have elected to retire from Meritor, Inc. and resign my position as president of the GRI. I was proud to be able to lead such a dynamic organization and be part of a great team of gear industry leaders. GRI, under the direction of its Board of Trustees and Managing Director, Aaron Isaacson, has demonstrated the ability to change with the times and develop testing technologies that continue to support the evolving gear industry.
I leave the GRI with a great leadership team and am proud to have Chad Behrman of Rolls Royce replace me as the President of the Gear Research Institute. I am confident he will continue to steer the GRI into the future as a leader in gear testing and research and development.
As we ended 2020 and head into 2021, we all hope that we can get back to a more normal state and everyone stays safe and healthy.
To end, from “Life Goes On”
Life will hit you
When you're unprepared,
So be grateful and take all
That you can while you're there.
Be safe all my friends,
Jack Masseth
Former President of the Board, GRI
Meritor (retired)

Research Project: Spline Test Development
In practice, spline damage (fretting wear) often seems to be an unpredictable occurrence. The most widely reported techniques for computing spline wear are numerical methods based upon Archard’s model and/or energy loss based methods. These techniques require testing for validation and seem to be unable to accurately capture the complexity of most systems. Dudley proposed a relationship for spline wear prediction in 1969, which has been modified over the years and is included in AGMA 6213-C16 for the calculation of allowable torque rating for the fretting and wear resistance of splines. The relationship utilizes a number of factors dependent on material, hardness, loading, alignment, application, etc. It appears that not much is known about how these factors were obtained and the relationship has been shown to break down when applied to several field failures observed by GRI’s single client sponsor for this work. A new method for prediction of spline wear has been proposed. Experimental validation was required which led to the work described herein.
Spline testing at GRI is not new. It was previously done in the early 2000s for the Aerospace Bloc research consortium. The test rig that was used at that time was high speed and did not have sufficient load capacity to drive wear failures in a cost effective time period. The program was suspended due to the high cost and long duration required to develop data. This time around, high speed was not a primary concern and a four-square approach was used that would enable the rig to support substantially higher test torques.
In typical four-square gear testing, the gears are designed to be the weak link and fail prior to any other test machine components. In this case, the gears are purely used for torque transmission and reversal in the four-square arrangement. To ensure that the gears do not fail during testing, the standard gear design was strengthened significantly. A 3:1 gear ratio was used with the spline test specimen coupled to the low speed shaft. The torque application and locking mechanism on the high speed shaft were redesigned to enable quick assembly/disassembly of the spline specimens for inspection during testing. Heavy duty shafts and higher capacity bearings were used for completion of the torque loop, enabling a maximum torque on the spline shaft of ~15,000 inch-pounds (1694 N-m). The test rig is able to introduce up to 1.5 degrees of misalignment with increments of 0.01 degrees. The rig has been designed to test splines with a variety of lubrication possibilities. Oil can be supplied via pressurized jet, grease can be packed in the spline and contained using a rubber boot or tests can be run dry/without lubrication. The spline shaft can operate anywhere between 100 - 1500 rpm. The four-square section of the test rig is shown in Figure 1 and a close up of an installed test spline is shown in Figure 2.
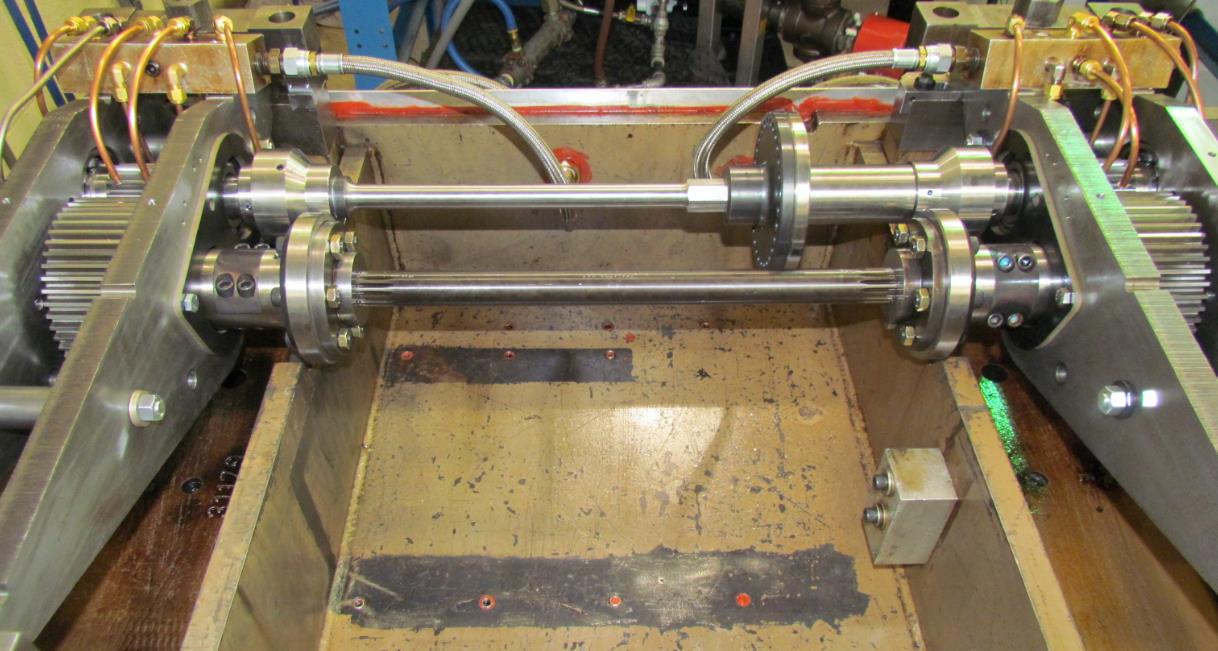
Figure 1: Four-square Spline Testing Arrangement
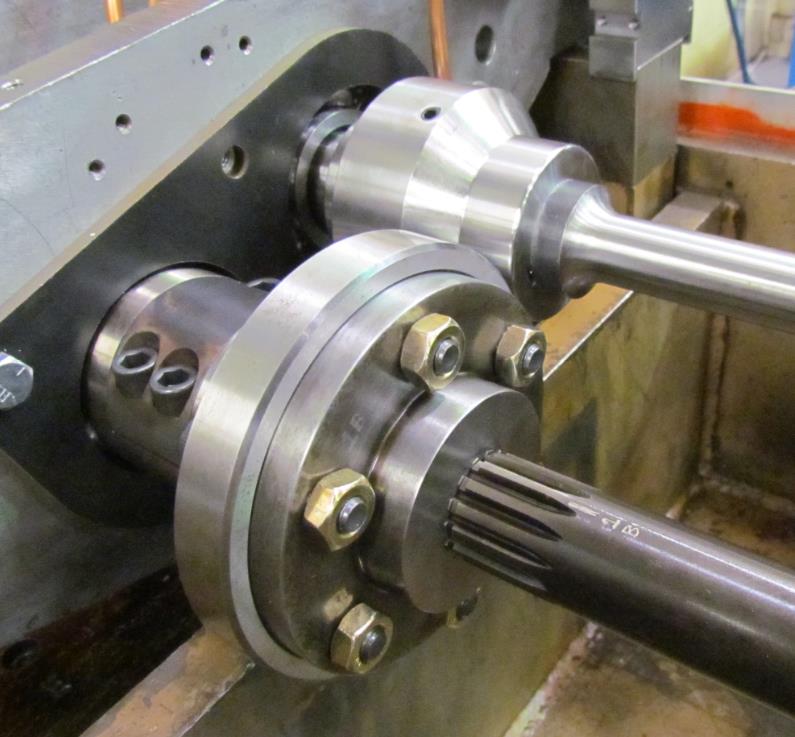
Figure 2: Spline Specimen Installed on Low-Speed Shaft
All of the test samples have their lead and involute profiles inspected prior to testing. Testing starts with a break in procedure that was established through collaboration with the sponsor. Visual inspections are performed at regular intervals. When wear is detected visually, the male spline shaft is removed from the rig, photographed, cleaned and carefully inspected using a gear inspection machine (see Figure 3) to determine the degree of wear present. An optical microscope image of a tooth with significant wear is shown in Figure 4. Note that the debris has been cleaned away ultrasonically in this image so that the amount of wear could be measured.
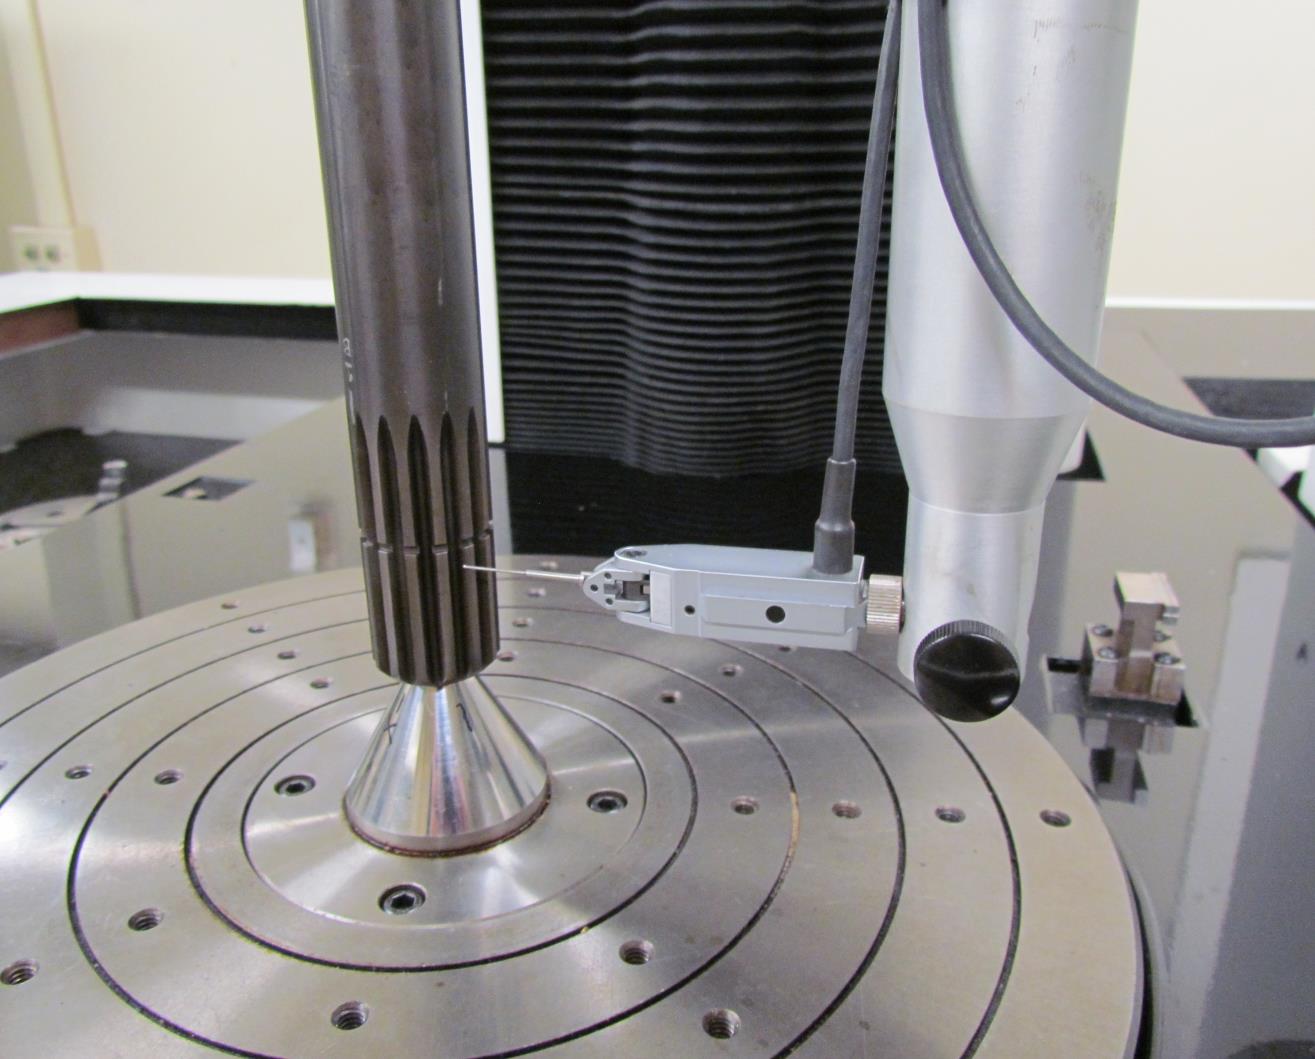
Figure 3: Spline Test Specimen on Inspection Machine
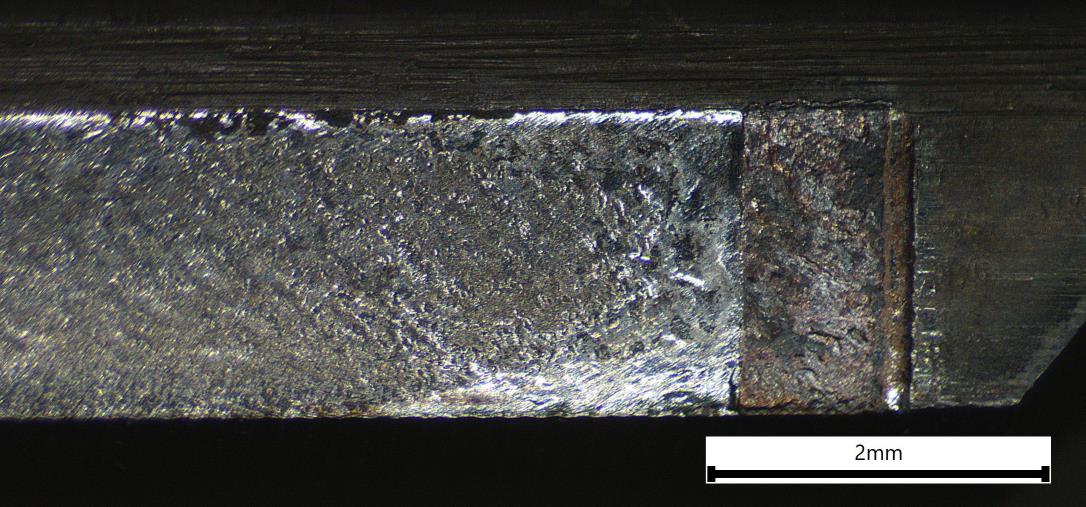
Figure 4: Optical Microscope Image Showing Fretting Wear at Edge of Contact Region
Preliminary results indicate that wear can be generated easily with this test method. Figure 5 shows how the wear measurements are typically presented. The gear inspection machine measurements taken at each inspection interval are subtracted from the baseline (untested) measurement to easily visualize and measure the magnitude and location of the damage.
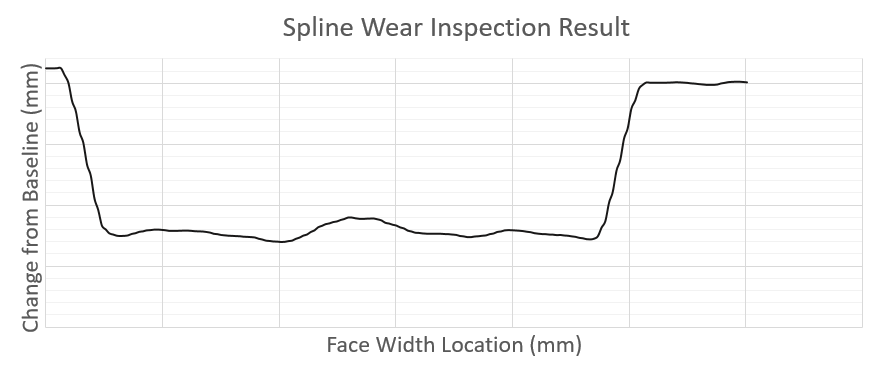
Figure 5: Plot Showing Change in Wear Across the Face Width versus Untested Sample
To summarize, GRI has developed a methodology to successfully evaluate spline wear performance. The test has the ability to introduce controlled misalignment under variable lubrication conditions. For more information on this test service please contact GRI today.
Education and Training
In order to assist with replenishment of the gear industry’s aging work force, the Gear Research Institute has developed a hands-on education program for students at both undergraduate and graduate levels. The results of the program are entry level engineers that have been trained in the basics of gearing. This involves incorporating engineering undergraduate students, at the junior/senior level and graduate students in the Institute’s research laboratory while being paid by a grant from the sponsoring industrial entity. Summer internships have also been arranged at the sponsor’s facility, so that the student and the sponsor have an opportunity to assess each other with future employment in mind.
Typically, students get hands on experience by setting up and monitoring gear test equipment with additional training topics such as gear metrology, failure analysis, metallurgical characterization, vibration monitoring for failure detection, statistical analysis of test data and more.
This newsletter’s student profile is of Hana Toth. Hana is pursuing her Bachelor of Science degree in Biological Engineering with an option in Agricultural Engineering and a minor in Off Road Equipment. Hana’s position was made possible through a grant from John Deere. She has been working in the GRI test lab supporting several projects since August of 2020 but her primary responsibility is to manage the low speed (150 rpm) gear testing program for John Deere. Hana has learned how to operate the test equipment, document the testing properly, and will perform fracture analysis, metallography and statistical analysis as the project proceeds throughout the spring semester.
Hana will graduate in May and is currently job hunting. Her goal is to work in the off highway equipment industry.

For more information about how you can support a student intern or sponsor a student project, please visit www.gearresearch.org or contact Aaron Isaacson at 814 865 5832 or This email address is being protected from spambots. You need JavaScript enabled to view it..
Board of Trustees News
Jack Masseth resigned from his position as President of the GRI Board of Trustees on October 21, 2020. The virtual send-off wasn’t ideal but we did manage to get a Nittany Lion statue shipped out to Wolverine/Spartan country. GRI is truly lucky to have had such a dedicated servant and ambassador. Jack will continue to advise the Board during the transition. We would like to wish Jack well as he pursues life after his gear career! May your drives go straight, your putts drop and your beer stay cold! We hope to see you soon for a proper send off.

GRI would like to announce the seating of new Board President, Chad Behrman of Rolls Royce. Chad was elected for the position by the GRI Membership on October 21, 2020. He has served on the Board as a Class C, Member elected trustee since 2018. GRI would like to thank Chad for undertaking this position and we look forward to working together for years to come.

Other News
GRI would like to remind readers to mark their calendars and plan to attend the AGMA Fall Technical Meeting to be held November 1-3, 2021 in Chicago, IL and the International Conference on Gears 2021 to be held September 15-17, 2021 in Garching (near Munich), Germany.
Employment Opportunities
Several years ago, a few Corporate Member companies requested that we add a “Job Postings” section to the GRI website for gear and drivetrain related positions. This service was (and continues to be) offered free of charge to our Corporate members and sponsors. There are currently very few active job postings on the site. If you’re company has a job opportunity that you would like to have publicized, please contact Aaron Isaacson at This email address is being protected from spambots. You need JavaScript enabled to view it..
The Gear Research Institute is a non profit corporation. It has contracted with the Applied Research Laboratory of The Pennsylvania State University to conduct its activities, as a sponsor within the Drivetrain Technology Center. The Gear Research Institute is equipped with extensive research capabilities. These include rolling contact fatigue (RCF) testers for low- and high-temperature roller testing, power circulating (PC) gear testers for parallel axis gears with a 4-inch center distance (testers can be modified to accommodate other center distances), single tooth fatigue (STF) testers for spur, helical and spiral bevel gears, and gear tooth impact tester. Extensive metallurgical characterization facilities are also available at Penn State in support of the Gear Research Institute. For further details on our testing capabilities please go to www.gearresearch.org or call Aaron Isaacson, Managing Director, at (814) 865-5832.
