Latest Transmissions Newsletter
Fall 2024 Newsletter – Transmissions Vol 29

Vol. 29, 2024
Foreword
It is with both sadness and excitement that I announce that I will be stepping down as President of GRI at our fall Board Meeting. Sadness that I will be saying goodbye to people that I have made as friends along the way, but with excitement as I will be entering a new phase of life and retiring. Now my retirement life will not be that of sitting on the couch and watching more football (which as I write this Penn State is currently undefeated!!), or at least not all the time. But more of part time farmer, part time handyman, part time mechanic, part time investor and part time drag racer. As I’ve already begun my retirement phase of life, I have quickly realized that I’m not sure how I ever had time for work!! God has truly blessed me in a multitude of ways throughout my life, of which I can’t even begin to count, but I look forward to seeing how I can be the hands and feet of Jesus helping those around me in the future.
One goal in my life has always been to leave a place better than when you got there. I would like to say that I’ve done that at GRI. Over the past several years we have: implemented numerous improvements from a business standpoint to simplify and optimize how GRI works; we have developed new testing methods in the lab; developed new data collection methods; brought in new inspection equipment; setup several new testing machines; and expanded our customer base. Overall, I believe that GRI is positioned better than ever to assist our customers with a complete package of gear testing; ranging from consultation, specimen creation, inspection, material characterization testing, failure analysis, and full analysis of results.
GRI is financially solid with growth from individual companies on single client projects, and within the Aerospace Bloc. New proposals for projects continue to go out, new contract agreements are coming in and prior contracts are being worked. Machine maintenance and risk mitigation against downtime have been implemented to ensure equipment is available and running smoothly.
I would like to thank everyone for the opportunity that I have been given to service as President these past few years and wish all the best of luck for the future. The GRI Board of Trustees is positioned well to keep the momentum of advancement at GRI.
God Bless,
Chad Behrman
President, Gear Research Institute

Research Project: Improved Bending Strength during Impact Loading
High strain rate (impact loading) gear testing has not been a common request in recent years. Recently, an automotive manufacturer approached GRI to assist with quantifying the impact performance difference between the incumbent production gear, a powder metal (PM) alloy, and two potential wrought replacement materials. The current production gear was experiencing bending failures that had been attributed by the OEM to impacts in the duty cycle. Fortunately, GRI specializes in the performance evaluation of production gear geometries. In cases where material performance is influenced by tooth geometry, like PM for instance, testing the production gear tends to provide the most representative test results.
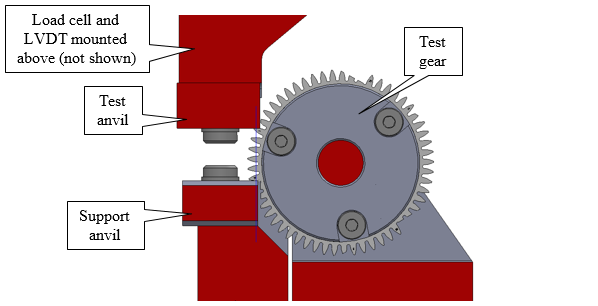
Figure 1: Cross-section view of impact test fixture and gear
The load application for typical gear tooth impact tests conducted at GRI is shown in Figure 1. The loading arrangement resembles that of single tooth bending fatigue (STBF) testing. The difference is that for impact testing the test anvil is mounted to the bottom of a mass (drop weight) that can be dropped from heights approaching ten feet high instead of on a stationary flex arm in the STBF test. The drop weight (adjustable up to 600 pounds) and test anvil are controlled using guide rods to ensure perfect loading on every impact. A piezoelectric load cell is located between the test anvil and drop weight, which is used to measure the force generated on the tooth during each test. The test device is also instrumented with an LVDT to measure the deflection of the tooth as load is applied. An image of the test gear mounted in the test fixture with the load anvil at the point of contact is shown in Figure 2.
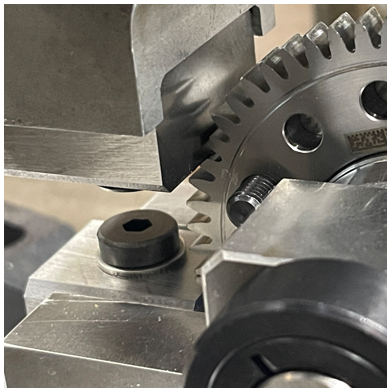
Figure 2: Production gear mounted in test fixture with impact test anvil resting at the point of contact
Prior to testing, the load and support points are checked using layout bluing to ensure the correct radial location and uniform contact across the lead. It is important to verify the contact location for each group and account for any differences by adjusting the test fixture or bending stress calculations. A typical test tooth loading pattern is shown in Figure 3.
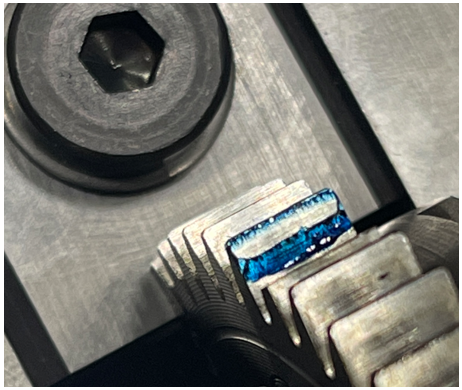
Figure 3: Test tooth with layout bluing applied, after gentle contact and removal of test anvil
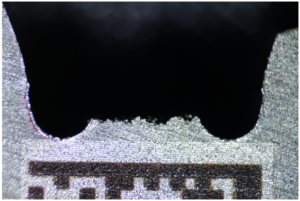
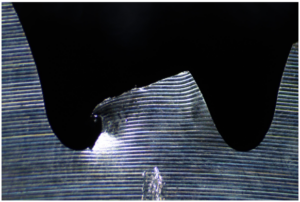
Upon completion of hardware setup, searching tests are performed starting at a low drop height (a few inches in this case) and progressively increasing in height. Tooth fracture surfaces are examined to ensure that the failure did not originate at the edge of the tooth. The aim is to have failures be a reflection of the material strength and not influenced by other factors (edge break or lack thereof, poor load application alignment, etc.). In this project, there was a clear difference in the failure characteristics of each material. For a given hardness, brittle materials tend to perform worse than ductile materials at high strain rates. Typical crack paths for each type are shown in Figure 4. Can you guess which one is PM?
 |
|
Figure 4: Typical failures, note the differences between ductile (left) and brittle (right) materials
The load versus position data for several repetitions of each group is presented in Figure 5. While there is some ringing in two of the three groups, clear strength differences exist. Comparisons are typically made using the first reduction in load (yield point), maximum load, and energy absorbed to both yield and max load.
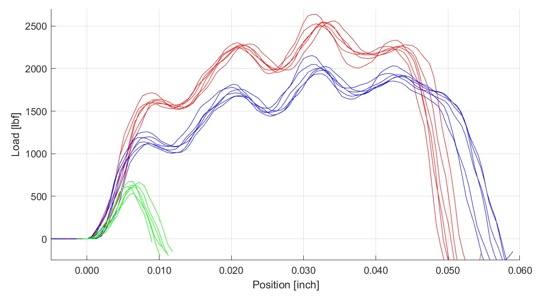
Figure 5: Impact test data for the same production gear with three different material groups
Figure 6 presents a unique view from a drop height of several feet showing the guide rods, safety stops, and test fixture clamped into place. I can almost hear Dr. Rao now, “those cracks weren’t in the floor before you did that highest one!”
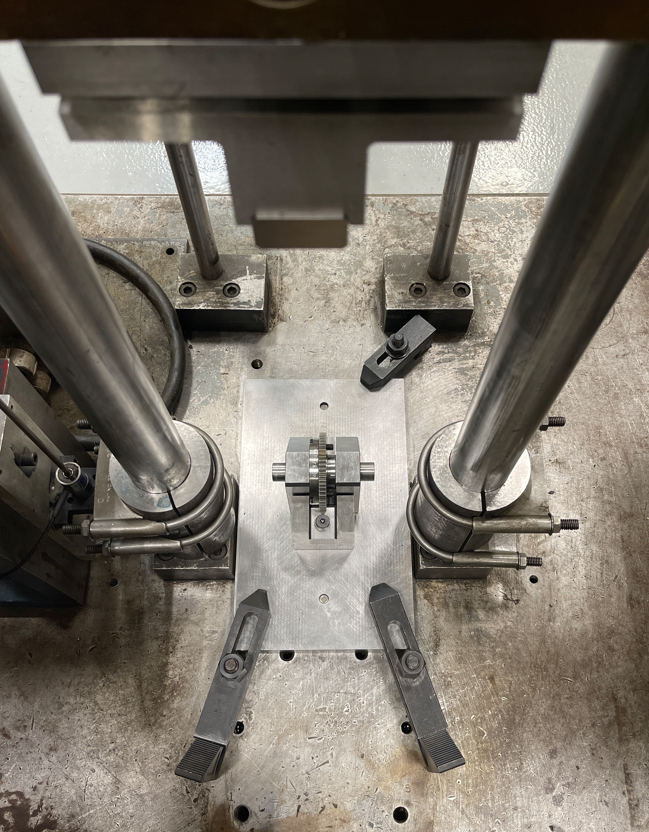
Figure 6: The view from the top of the drop!
Education and Training
In order to assist with replenishment of the gear industry’s aging work force, the Gear Research Institute has developed a hands on education program for students at both undergraduate and graduate levels. The results of the program are entry level engineers that have been trained in the basics of gearing. This involves incorporating engineering undergraduate students, at the junior/senior level and graduate students in the Institute’s research laboratory while being paid by a grant from the sponsoring industrial entity. Summer internships have also been arranged at the sponsor’s facility, so that the student and the sponsor have an opportunity to assess each other with future employment in mind.
Typically, students get hands on experience by setting up and monitoring gear test equipment with additional training topics such as gear metrology, failure analysis, metallurgical characterization, vibration monitoring for failure detection, statistical analysis of test data and more.
This student profile for this issue is of Derek Reinmiller. Derek is pursuing his Bachelor of Science degree in Aerospace Engineering with a minor in Engineering Mechanics. Derek’s position at GRI was partially funded through a grant from John Deere. He has been working in the gear test lab supporting several projects since January of 2024. Derek has spent time learning about gear fatigue failure modes, setting up gear test machines, and most recently learning how to generate and interpret gear inspection reports. This valuable laboratory experience will benefit him for years to come as he begins his career in engineering.
Derek has previous internships with Timken (Canton, OH) and Lockheed Martin (Littleton, CO). He will graduate in May of 2026 and is currently planning to do another internship with Lockheed Martin next summer. His goal is to work in the aerospace industry, more specifically; he wants to design things that go to space!

Derrick Reinmiller
For more information about how you can support a student intern or sponsor a student project, please visit www.gearresearch.org or contact Aaron Isaacson at 814-865-5832 or aci101@arl.psu.edu.
Board News – Retirement Announcements
After many years of service to GRI, Dr. Teik Lim, Dr. Avinash Singh and Mr. Amir Aboutaleb have retired from the Board during the past year. We would like to thank them both for their contributions and wish them well in their future endeavors. Teik is currently the President of the New Jersey Institute of Technology and Avinash is Engineering Group Manager for Electric Motors and Starters at General Motors.
 Dr. Teik Lim Dr. Teik Lim |  Dr. Avinash Singh Dr. Avinash Singh |  Amir Aboutaleb Amir Aboutaleb |
Board News – New Members
Ben Sheen from Eaton Corporation, Derrick Black from General Motors, and Todd Praneis from the American Gear Manufacturers Association (AGMA) have been selected to serve on the GRI Board.
Ben Sheen holds a bachelor’s degree in mechanical engineering from the University of Wyoming, he is currently supporting new product development and manufacturing capabilities within Eaton’s ePowertrain Business Unit. His 20-year career with Eaton began with its Truck Group’s heavy-duty transmission site in Shenandoah, Iowa and for the past 13 years, he worked at the Mobility Group headquarters in Galesburg, Michigan. His accomplishments include certifications within Six Sigma (Blackbelt), Shainin RedX, AGMA Advanced Gear Engineering Certificate, and multiple U.S. patents. Ben was elected by the GRI Membership to serve a three-year term on the Board.

Ben Sheen
Derrick Black has a Bachelor of Science degree in Mechanical Engineering from Lawrence Technological University, a Master of Science degree in Mechanical Engineering (focus in Solid Mechanics) from Oakland University, and a Master of Science degree in Mechanical Engineering (focus in Materials) from the University of Michigan, Ann Arbor. He is currently a Global Technical Specialist – Gear Systems at General Motors. Derrick has 25 years of engineering experience and has vast experience in all aspects of gearing. Derrick has served roles in Advanced Engineering, Design Release, Gear manufacturing, and Gear system virtual validation. Prior to joining GM, Derrick worked at Daimler Chrysler, Ford – Visteon, and NYE Lubricants. Derrick has won the coveted Boss Kettering Award, GM’s highest technical honor. He also has two patents issued. Derrick was appointed by the American Society of Mechanical Engineers (ASME) to serve a three-year term on the Board.

Derrick Black
Todd Praneis is a degreed mechanical engineer with over 30 years of experience in the design, manufacture, and test of enclosed gear drives and management of both Design Engineering and Quality. He has product experience ranging from 100 to 2500 horsepower diesel engine driven gearboxes as well as high-speed gearboxes from 20 to 5000 horsepower and from 10,000 to 90,000 rpm. Todd has experience in quality management systems and ISO 9001 certification. He has been a member of various AGMA technical committees including Enclosed drives for industrial applications, Spline, High-speed helical enclosed drives, Technical division executive committee, AGMA board of directors, and the AGMA executive committee, starting with the first one in 2002. Todd was appointed by the AGMA to serve a three-year term on the Board.

Todd Praneis
Board News – Degree Completion
GRI would like to congratulate our Managing Director, Dr. Aaron Isaacson, on the recent completion of his Doctorate of Philosophy degree in Materials Science and Engineering. Dr. Isaacson successfully defended his work titled, “Microstructural Evolution under Loss of Lubrication Conditions in Aerospace Gear Steels” in January 2024 and received his degree at the spring graduation ceremony at University Park, PA.
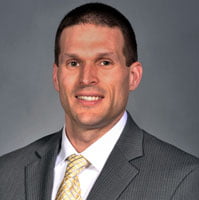
Dr. Aaron Isaacson
Capability Enhancement – Gear Inspection
GRI continues to offer new capabilities to our sponsors. We (through ARL Penn State) have received a new Gleason GMS350 gear inspection machine! Having the ability to inspect gears on-site is critical to many of the projects that we perform. The capability enhancements offered by the new machine are amazing. Having one instrument to measure flank roughness, fillet radius, shaft features, and of course gear geometry will save a lot of time and improve the quality of work done for our sponsors. Combining these features with the ability of the machine software to interface with KISSSoft has our engineers salivating.
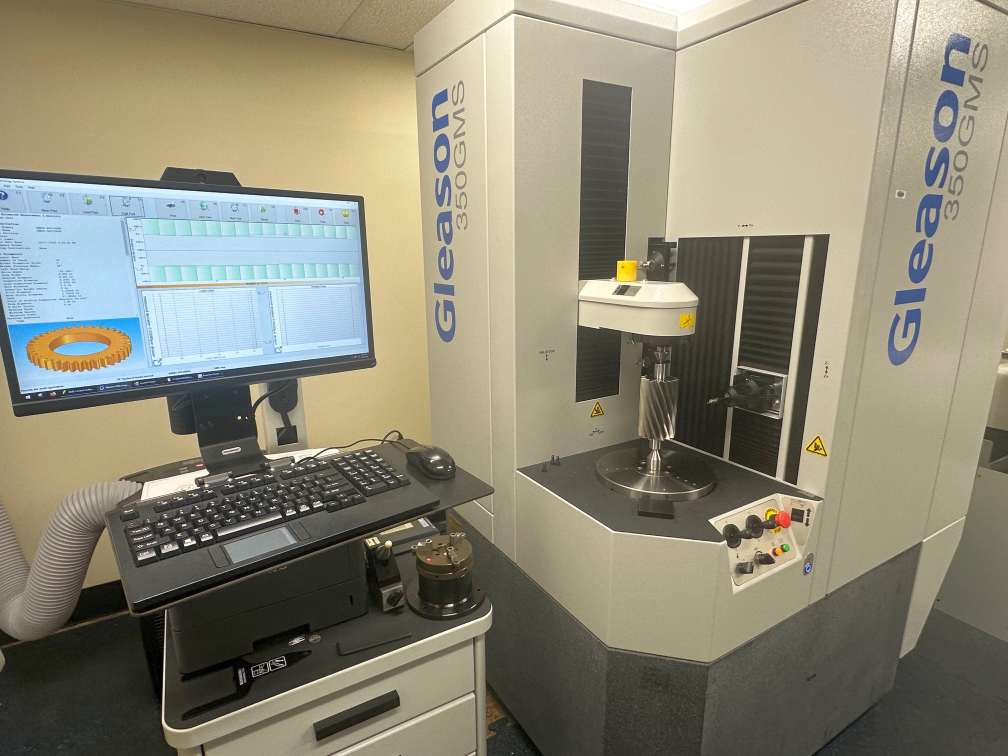
Gleason 350GMS Gear Measuring Machine
Capability Enhancement – Instrumentation
The traditional power re-circulating (aka four-square, back-to-back, or FZG) test approach utilizes the application of a known torque through a mechanically locking load clutch to set the “test torque” for each test. Due to concerns of slippage in the load clutch, the applied test torque is typically checked at regular intervals to ensure the torque does not decrease throughout the test. This was somewhat of a blind process until now. GRI has added continuous torque monitoring to several test machines. The torque data is monitored and recorded throughout testing. If the torque decreases for any reason, the test machine will automatically shut down. If the trial testing continues to go well, the remainder of GRI’s rigs will be instrumented soon.
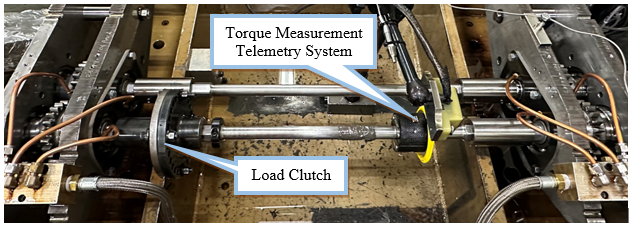
Torque Telemetry System Installed on PC Gear Test Rig
Facility Improvement
The previous newsletter hinted that a portion of the GRI and ARL Drivetrain Technology Center lab space in Research Building West was undergoing renovation. The space has been transformed and is now home to seven brand new servo-hydraulic fatigue test frames (100 kN) with hydraulic wedge grips and a 60 gpm silent-flo hydraulic power unit. In the near term, this equipment will be used primarily for material property development studies to support US Navy programs. Upon completion, the test frames will be available to support other programs, including those for GRI.
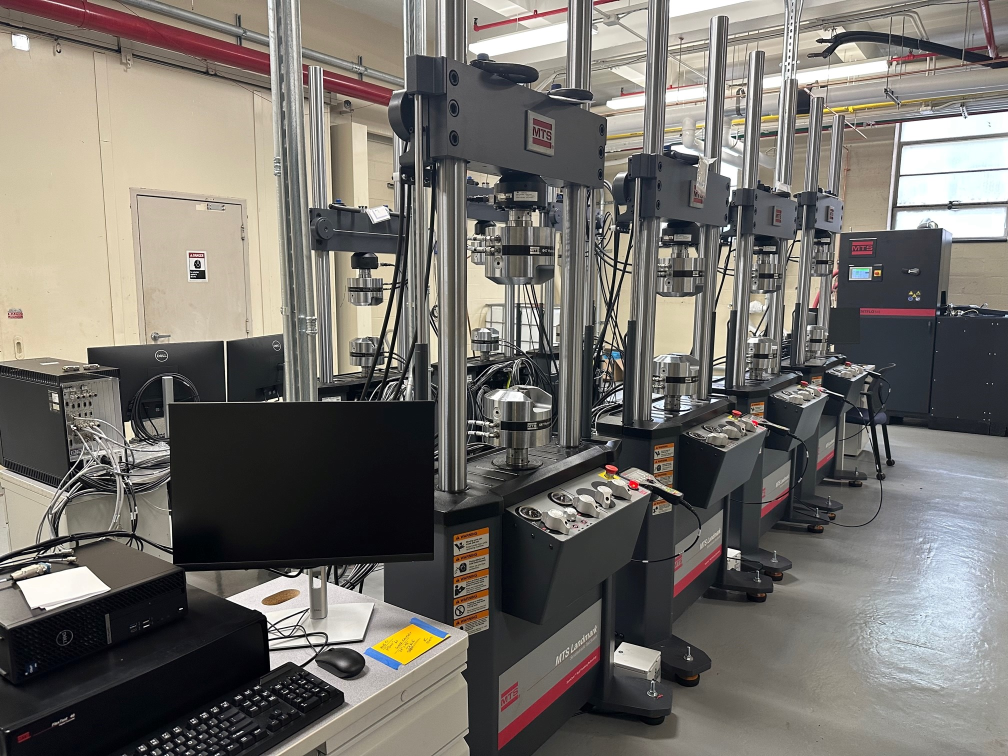
New Hydraulic Fatigue Testing Frames located in 68RBW
Other News
We would like to remind readers about the importance of sharing your work. Please consider sharing information about your successes (and even your failures!) at the one of these upcoming conferences. All of these gatherings offer unparalleled networking events and the opportunities to stay informed about the latest work in and around the gear industry. Additional information can be found by clicking on any of the banners below.
The call for presentations has recently closed for the gears session of the 2025 STLE Annual Meeting (Atlanta, GA). However, Dr. Isaacson is serving as paper solicitation chair for the coming year. If you would like to present to the STLE audience, please reach out to him at aci101@arl.psu.edu as soon as possible to get your abstract approved.

Paper calls are currently open for both the 2025 AGMA Fall Technical Meeting (Detroit, MI) and the VDI International Conference for Gears 2025 (Garching, Germany). Please consider which is appropriate for your work and submit accordingly.

The Gear Research Institute is a non-profit corporation. It has contracted with the Applied Research Laboratory of The Pennsylvania State University to conduct its activities, as a sponsor within the Drivetrain Technology Center. The Gear Research Institute is equipped with extensive research and testing capabilities. These include rolling contact fatigue (RCF) testers for low- and high-temperature roller testing, power circulating (PC) gear testers for parallel axis gears with a 4-inch center distance (testers can be modified to accommodate other center distances), single tooth bending fatigue (STBF) testers for spur, helical and spiral bevel gears, single tooth reversible bending fatigue (STRBF) testers for spur gears, and gear tooth impact tester. Extensive metallurgical characterization and gear metrology facilities are also available at Penn State in support of the Gear Research Institute. For further details on our testing capabilities, please go to www.gearresearch.org or call Aaron Isaacson, Managing Director, at (814) 865-5832.

